
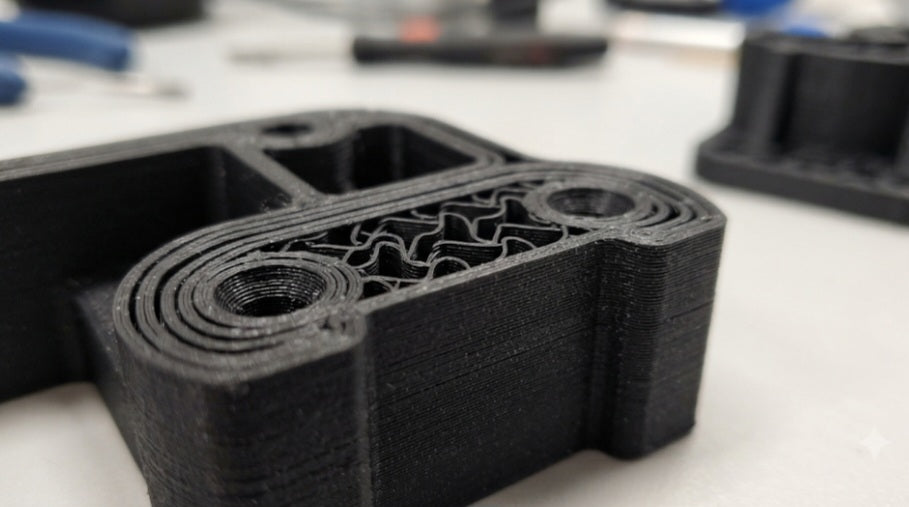
Engineering the Shell: Why Perimeter Count Dictates Structural Integrity and How Many Walls Your Functional 3D Prints Actually Need
When engineering functional end-use components via fused deposition modeling, the instinct of many practitioners is to crank up the infill density to 80% or 100% in search of mechanical strength. However, physical testing and finite element analysis consistently prove that interior lattice structures play a secondary role compared to the outer perimeter shells. For heavy-duty industrial parts, mechanical resilience, impact resistance, and torsional rigidity are overwhelmingly governed by the number of walls and the thickness of the outer perimeter boundary.
The Structural Mechanics of Perimeter Shells
Primary Load Bearers:
Perimeter walls carry the vast majority of tensile, bending, and shear loads applied to a 3D printed component. Because the nozzle traces continuous vector loops around the perimeter of the part, these lines offer uninterrupted structural continuity.
The Diminishing Returns of Infill:
High infill densities primarily serve to support top horizontal bridging layers and prevent surface deformation under loads, rather than adding significant tensile strength. Adding extra perimeters provides exponentially more flexural rigidity than packing the core with dense infill.
Inter-Layer and Inter-Wall Bonding:
Increasing the wall count allows adjacent extrusion passes to fuse more thoroughly during deposition, creating a thick, solid outer barrier that resists cracking and stress concentration.
Determining the Ideal Wall Count for Industrial Parts
Standard Functional Parts (3 to 4 Walls):
For general brackets, enclosures, and non-critical mechanical fixtures printed with a standard 0.4 mm nozzle, a minimum of 3 to 4 perimeter walls (translating to a 1.2 mm to 1.6 mm wall thickness) provides a dependable baseline for everyday operational loads.
Heavy-Duty and Load-Bearing Components (5 to 8+ Walls):
For high-stress applications such as mounting plates, gear housings, or components subjected to continuous mechanical clamping forces, increasing the perimeter count to 6, 8, or even solidifying the entire cross-section via walls ensures maximum structural yield.
Leveraging Wider Extrusion Widths:
Workshops utilizing larger nozzles—such as a 0.6 mm or 0.8 mm setup—can achieve massive structural wall thicknesses with fewer individual passes, drastically cutting print times while maintaining superior interlaminar fusion.
Optimizing perimeter counts transforms a standard prototype into a robust, industrial-grade mechanical component. By shifting your focus away from dense internal infills and engineering a thick, multi-wall perimeter shell, your workshop can eliminate structural weak points and produce reliable 3D printed parts built to endure demanding operational environments.
To maximize this perimeter-driven strength further, consider pairing increased wall counts with adaptive slicing features in software like PrusaSlicer or Cura. Enabling alternating extra perimeters or gradient wall thicknesses ensures that high-stress radii and internal fastener channels receive reinforced structural rings, while less critical transitional zones maintain standard wall counts to conserve both material and print time.


