
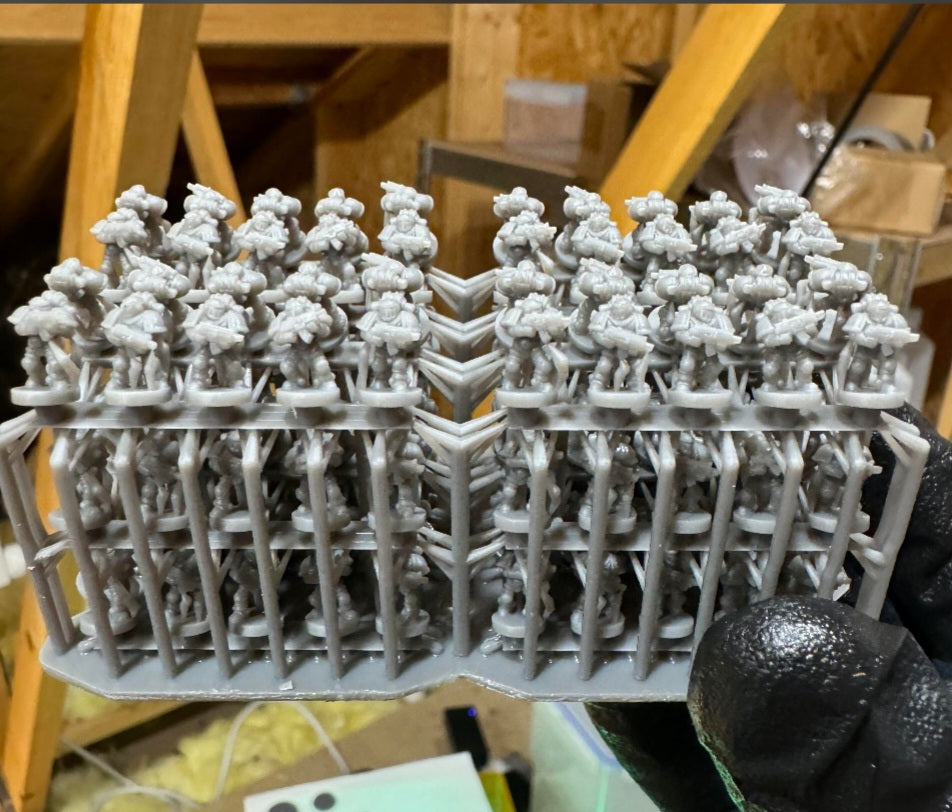
Maximizing the efficiency of your resin 3D printer build plate is essential whether you are running a commercial print farm or preparing a full squad of tabletop figures for an upcoming campaign. Simply scattering models randomly across your slicer bed often leads to failed prints, suction cup vacuums, or models colliding mid-print. By mastering plate layout strategies, optimal tilt angles, and smart spacing techniques, you can safely pack 20 or more miniatures onto a standard-sized monochrome LCD build plate without sacrificing structural integrity or surface detail.
Calculating Build Plate Area Constraints:
Mapping out your printer’s exact XY dimensions ensures you leave a safe 5mm border around the outer edges to prevent light distortion and incomplete edge exposures.
The Magic of 45-Degree Model Tilting:
Angling miniatures back at roughly 35 to 45 degrees drastically reduces the surface area of each individual layer, lowering peel forces and preventing violent suction pulls against the FEP film.
Interlocking and Nesting Footprints:
Alternating the facing directions of miniatures allows you to slide their base plates and supporting structures close together, effectively maximizing every square millimeter of dead space.
Managing Z-Height and Print Time Trade-offs:
Keeping your clustered models at a uniform vertical height prevents unnecessary tall movements, ensuring the entire batch finishes simultaneously without wasting screen hours.
Optimizing density further requires careful attention to support placement to avoid a chaotic "forest" of intermingling scaffolding that becomes impossible to clean. Utilizing island-based automatic support generation combined with manual point reinforcement ensures that adjacent miniatures do not share overlapping support tips, which would otherwise fuse separate models together during photopolymerization. Additionally, hollow models with strategically placed drain holes located near the base feet allow you to cluster figures much closer together safely, as internal vacuum pressure is completely eliminated during the upstroke.
Beyond spatial layout and support management, thermal regulation across a densely packed build plate remains a heavily overlooked variable during high-volume batch printing. When twenty or more models cure simultaneously, the exothermic chemical reaction releases micro-amounts of heat right across the FEP film interface. In local environments experiencing fluctuating ambient temperatures or heavy power volatility, localized thermal gradients can cause uneven resin curing speeds, occasionally warping the outer perimeter models on the plate while central figures print flawlessly. Pre-warming your resin bottle and maintaining a stable ambient workshop temperature mitigates these thermal discrepancies across large batch runs.
Mastering high-density batch printing transforms your workflow from a slow, single-model bottleneck into a high-yield production line. By carefully balancing spacing, strategic model orientation, and thermal stability, you can consistently churn out an entire squad of flawless figures on a single build plate without risking plate crashes or structural failures. Implementing these advanced packing techniques ensures maximum efficiency, saving both precious photopolymer material and valuable printing hours for your maker space.


