
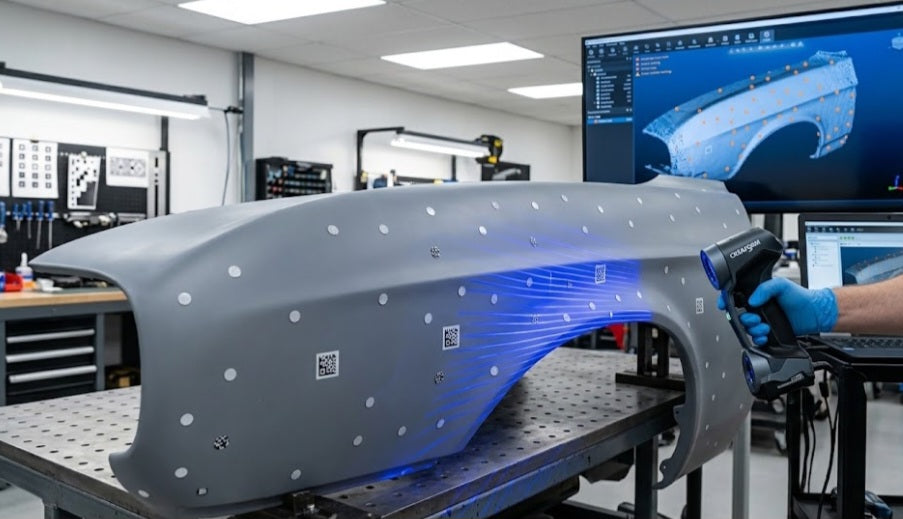
When digitizing large, sweeping automotive bodywork—such as a front fender, rear quarter panel, or sculpted bonnet—metrology systems face a subtle geometric hurdle: featureless, continuous curvature. Unlike engine blocks or gearbox housings rich with bolt holes, stepped bosses, and sharp geometric breaks, a curved car panel offers virtually no distinct topographical landmarks for a 3D scanner's software algorithms to track. Without sufficient reference features, handheld optical scanners easily experience "slippage" or lost tracking, leading to surface warping, artificial point cloud accumulation, or broken scans mid-pass.
To bridge this gap, optical metrology relies on targets (positioning markers). However, placing these reflective dots across a sweeping sheet-metal surface requires a deep understanding of spatial density, line-of-sight angles, and planar projection math. Let's break down the technical breakdown of how target placement impacts tracking performance, scan registration, and volumetric accuracy across curved car panels.
The Featureless Geometry Challenge:
Smooth, uniform curves force the scanner to rely almost entirely on target positioning rather than surface geometry features for spatial triangulation.
Density vs. Redundancy:
Insufficient marker density causes frequent tracking dropouts, while over-clustering targets wastes time, risks obscuring key surface details, and introduces post-processing fill workload.
Asymmetrical Constellation Patterns:
Placing markers in rigid, symmetrical grids can confuse alignment software, whereas random, asymmetric distribution provides unambiguous orientation data to the tracking algorithms.
Perspective Distortion on Sharp Compound Curves:
As a panel curves away from the optical sensor, round targets appear as flattened ellipses, requiring high-contrast, high-angle retro-reflective dots to maintain camera lock.
Step-by-Step Target Setup and Tracking Protocol
Achieving seamless, error-free tracking across a large curved vehicle panel requires a disciplined protocol for marker application and motion planning.
Surface Inspection and Degreasing:
Clean the painted or primed panel thoroughly with isopropyl alcohol. Residues or wax prevent adhesive target dots from lying completely flat, which distorts the calculated center point of the marker.
Establishing an Asymmetrical Marker Constellation:
Apply reflective positioning dots across the panel in a non-uniform, pseudo-random layout. Maintain an average distance of 50 mm to 100 mm between targets so that at least 4 to 6 markers remain visible in the scanner’s field of view at all times.
Placing Anchor Points on High-Curvature Edges:
Secure extra markers along wheel-arch lips, body character lines, and panel edges. These transition zones provide critical geometric anchors that bind the flat central sweep to adjacent mounting points.
Calibrating Scanner Exposure for Marker Reflections:
Adjust the scanner’s target-sensitivity settings so the optical cameras pick up the retro-reflective target centers sharply without washing out the surrounding paint or primer finish.
Executing Dynamic Orbital Sweeps:
Maintain a perpendicular standoff distance, angling the scanner smoothly around tight wheel arches to ensure the optical sensors view each target constellation from multiple line-of-sight perspectives.
Post-Processing Target Removal and Surface Reconstruction:
Utilize automated target-hole filling algorithms in your metrology software to patch the small circular gaps left by the markers, restoring a perfectly smooth NURBS surface or STL polygon mesh.
Advanced Target Physics and Volumetric Accumulation Errors
Beyond basic line-of-sight tracking, marker distribution directly influences volumetric error propagation over long physical spans. When scanning an expansive component like a complete vehicle side panel, tiny registration errors between consecutive scan frames can accumulate along the length of the part, causing the digital mesh to "banana" or warp at the far end. Using strategic combinations of coded targets, photogrammetry reference scale bars, and high-contrast positioning dots anchors the coordinate system globally. This prevents drift and guarantees that your digitized fender or quarter panel matches factory CAD tolerances across its entire length.
Mastering target application on curved automotive panels transforms unpredictable, frustrating scan passes into a repeatable, metrology-grade workflow. By strategically placing asymmetrical marker constellations and managing camera line-of-sight angles, you eliminate tracking slippage and ensure absolute spatial accuracy for custom body kit design and vehicle restoration.


