
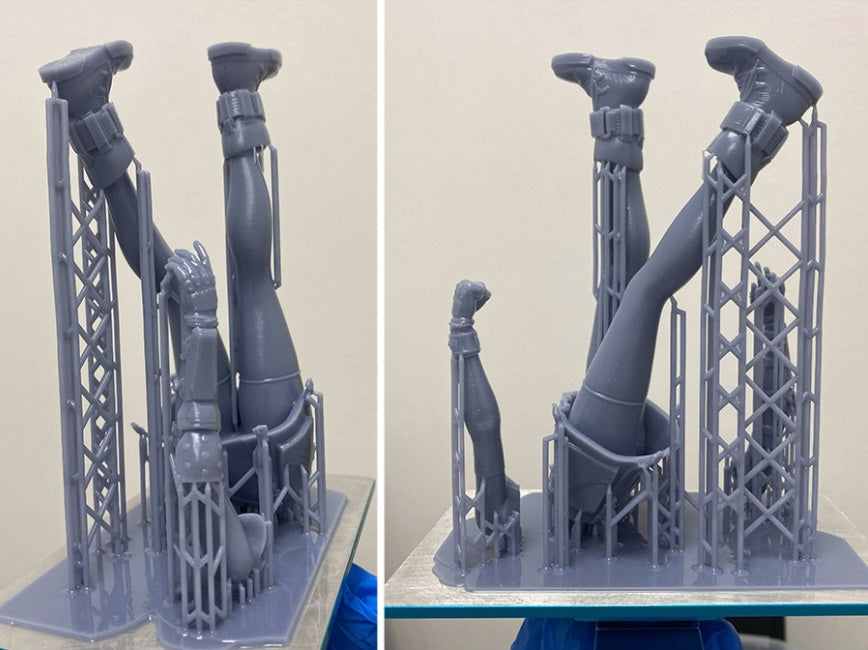
You have spent hours modeling or downloading the perfect 3D asset, your build plate is leveled, and your exposure settings are dialed in.
You hit print, walk away feeling confident, and return to find a warped helmet, sheared details, or a flat-out structural failure. What went wrong?
In resin 3D printing, model orientation is often the missing puzzle piece. Unlike filament printing where gravity does most of the heavy lifting layer by layer, resin printing relies heavily on peel forces.
Every single time the build plate rises, the freshly cured layer peels away from the flexible FEP or nFEP film at the bottom of the vat. If your model is positioned incorrectly, the suction forces will rip it right off its supports.
Here is a professional guide on how to position and angle your resin models to guarantee clean details and a 100% success rate.
The Golden Rule: Avoid Flat Surfaces
(The 45-Degree Angle)
The single biggest mistake beginners make is laying a flat-bottomed model—like a base, a square box, or the flat back of a bust—directly parallel to the build plate.
The Problem:
When a massive flat surface peels off the FEP film all at once, it creates a massive vacuum suction cup effect. This often rips supports to shreds, leaves horizontal suction lines, or pulls the print right off the build plate.
The Solution:
Tilt your models at a 35 to 45-degree angle. Tilting distributes the surface area across multiple layers rather than hitting the FEP all at once. This drastically reduces peel forces and suction drag.
Key Factors to Consider When Orienting Your Print
- Hide Your Support Marks (The "Facing Away" Rule)
Supports leave tiny little contact bumps (scarring) on the surface of your resin print once you clip and sand them down.
Always orient your model so that the most detailed, highly visible front or feature-facing side points away from the build plate (facing upward and outward).
Hide your support contact points on the bottom, back, or inside edges of the model where they won't ruin prominent aesthetic details.
2. Hollow Out Large Models and Add Drain Holes
If you are printing something bulky like a large monster miniature, a vase, or a cosplay prop, do not print it solid. Solid prints trap massive suction vacuums and waste enormous amounts of resin.
Hollow it out in your slicer (leaving a wall thickness of about 1.5mm to 2.5mm).
Crucial Step:
Always add at least two drain holes near the bottom of the model (closest to the build plate) and near the top (closest to the plate). If you don't add drain holes, the trapped suction will either implode your print or create a sealed vacuum chamber full of uncured liquid resin that leaks later.
3. Minimize Island Overhangs
An "island" is a portion of a model that appears out of nowhere in mid-air on lower layers without being connected to the main body yet. While your slicer will generate supports for these, excessive floating islands lead to messy surfaces and failed supports. Angle your model so that features flow smoothly downward into previous layers.
Step-by-Step Orientation Workflow in Your Slicer
Import and Inspect:
Drop your STL file into your slicer (Chitubox, Lychee, etc.) and look for large flat planes or delicate protruding details like swords, fingers, or hair strands.
Tilt the Model:
Rotate the model on the X or Y axis by roughly 40 degrees to eliminate flat horizontal surfaces facing the screen.
Elevate Above the Plate:
Never place the model's bottom edge touching the build plate directly unless you want to deal with elephant's foot distortion. Elevate the model by 5mm to 10mm and let your slicer generate a raft and automatic scaffolding supports underneath.
Check for Cupping:
Look closely at hollow shapes or helmets. If a cup-like shape opens downward toward the screen, it will trap air and suction. Rotate or tilt the cup sideways so it doesn't scoop up liquid resin and create a hydraulic bomb during printing.
Master the Angle, Master the Print
Orientation is part science and part art. By swapping flat horizontal layouts for dynamic 45-degree angles, hollowing out your heavy prints, and hiding your support scars on the back-facing sides, you will instantly eliminate your most frustrating printing failures.
Take an extra two minutes to inspect your angles before slicing, and your post-processing cleanup will be smoother than ever.


