
Mastering LightBurn Software
LightBurn is widely considered the gold standard of laser engraving software. Unlike basic manufacturer apps, it gives you total control over your machine's vector design, power settings, speed, and framing. If you have recently set up your diode or CO2 laser, diving into LightBurn can feel a bit overwhelming with all its panels, toolbars, and settings.
This step-by-step beginner's guide will take you from opening a blank workspace to running your very first successful engraving.
Connecting Your Laser and Setting Up the Workspace
Before creating any designs, your software needs to communicate smoothly with your hardware.
Add Your Machine:
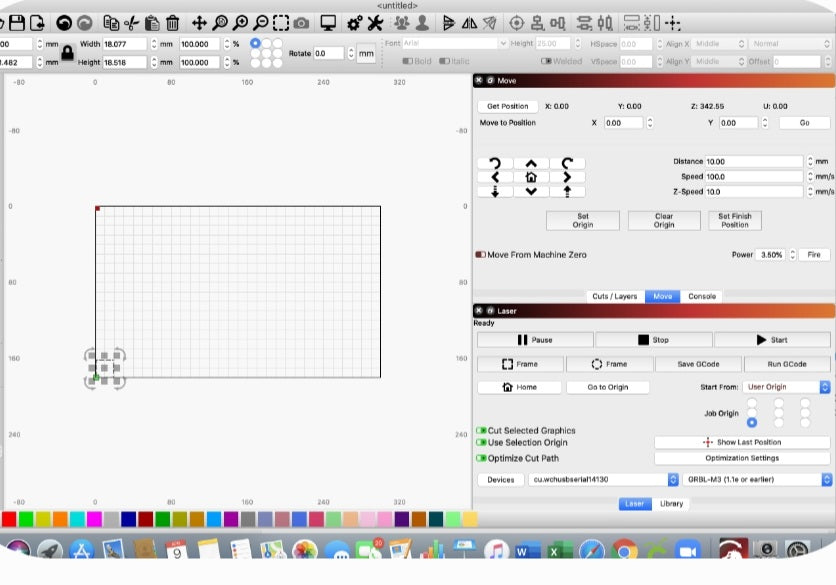
Open LightBurn and run through the device setup wizard. Select your controller type (such as GRBL, Ruida, or Marlin) and input your exact bed size (e.g., 400x400mm).
Select the Correct Port:
Plug your laser into your computer via USB, go to the Laser window tab, and ensure the correct COM port is selected from the drop-down menu so it says "Ready."
Establish Origin:
Familiarize yourself with your job origin (usually front-left or rear-left) so your design placement on the screen matches where the laser head sits on your physical bed.
Creating or Importing Your First Design
You don't need complex design software to start; LightBurn includes powerful built-in vector creation tools.
Basic Shapes and Text:
Use the shape tools (rectangles, ellipses) or the Text tool on the left toolbar to create a simple keychain or test tag.
Importing Files:
If you have an SVG, DXF, PNG, or JPG file, click File > Import to bring your artwork directly into the workspace.
Resizing and Positioning:
Click your design and use the top numerical toolbar to scale it to a safe, small test size (like 30mm x 30mm). Drag it roughly to the center of your virtual work area.
Understanding the Cuts/Layers Window (Speed, Power, and Modes)
The core of LightBurn relies on color-coded layers found in the Cuts/Layers window in the top-right corner.
Assigning Layers:
Every line or shape you draw can be assigned a specific color from the palette at the bottom of the screen. Each color represents a distinct layer instruction.
Setting the Mode:
Double-click a layer in the Cuts/Layers window to open its settings:
Line:
Used for vector cutting through materials.
Fill:
Used for raster engraving/darkening solid shapes.
Fill:
Used for raster engraving/darkening solid shapes.
Dialing in Speed and Power:
Enter safe starting values for your material. For a basic wood test burn using a diode laser, a lower power (e.g., 60% power) and moderate speed (e.g., 1000 mm/min) is a safe place to start.
Framing and Position Check
Never hit "Start" without framing your project first—this prevents the laser from running off your material or hitting the frame bounds.
Click "Frame": In the Laser window, click the Frame button. Your laser head will trace an invisible rectangular border around where your design is about to burn.
Use the Boundary Check:
Watch the laser head movement to ensure the bounding box fits entirely within your scrap wood or test piece. If it doesn't, reposition your design on the screen or move your physical material.
Hitting Start and Monitoring Your First Job
Once your material is focused, your safety glasses are on, and your ventilation/air assist is running:
Send to Laser or Start:
You can click Start to run it directly via USB, or Save GCode if you prefer running it off an SD card.
Stay Nearby:
Never leave a running laser unattended. Keep your hand near the emergency stop or power switch just in case adjustments are needed.
Inspect and Adjust:
Once finished, evaluate your results. If it didn't cut or burn deeply enough, slightly increase your power or slow down your speed for the next run.
Your Gateway to Laser Mastery
Getting comfortable with LightBurn opens up endless possibilities for your creative projects and e-commerce store. By mastering your workspace connections, layer settings, and the crucial framing step, you can transition from complete beginner to confident operator in no time.
Take it slow, run test grids on scrap material, and soon you'll be executing complex multi-layer vector designs effortlessly.


