
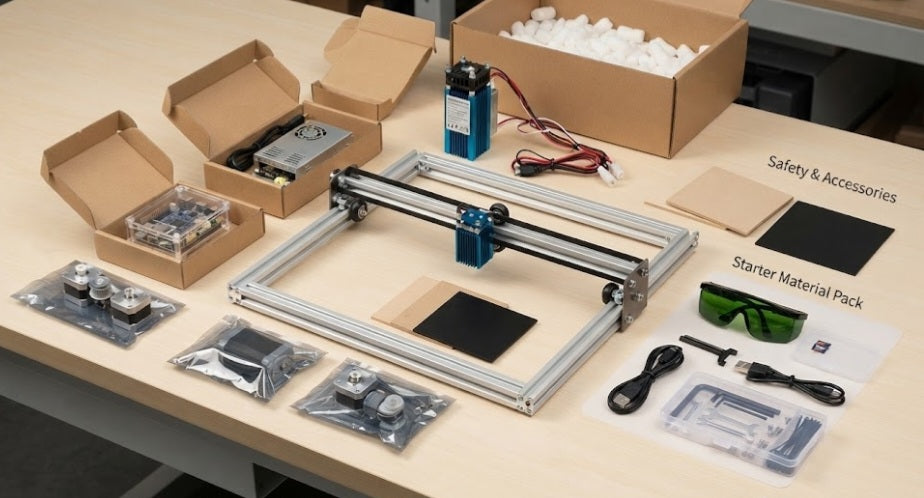
Unboxing your very first laser engraver is an exciting milestone for any maker. Whether you purchased a desktop diode laser or a modular kit, opening that shipping box reveals a collection of mechanical parts, wiring, and safety gear.
Knowing what to expect inside the box helps you inventory your components quickly and get your workshop ready for your first build.
Inside the Box: Standard Components Breakdown
Frame and Mechanical Assemblies:
Pre-cut aluminum extrusion rails (the X and Y axes).
Corner brackets, belt tensioners, and pre-assembled gantry wheels.
Timing belts and stepper motors that drive the laser head's movement.
The Laser Module:
The core optical head (e.g., 10W or 20W diode module) complete with a heatsink, cooling fan, and adjustable focus block or fixed focus spacer.
A protective laser shield or integrated optical filter window.
Electronics and Wiring:
A dedicated motherboard enclosed in a protective case.
Power supply unit (PSU) with regional plug cables.
Wiring harnesses and limit switches (end-stops) for homing the machine.
Safety and Test
Accessories:
A pair of wavelength-specific laser safety glasses (crucial for 450nm blue diode lasers).
A small starter pack of test materials, such as small sheets of thin basswood, MDF, or acrylic.
Tools and Hardware:
Allen keys (hex wrenches), open-ended wrenches, and spare screws or zip ties for assembly and cable management.
USB cable or TF/MicroSD card containing software manuals and test files.
Beyond the physical hardware and starter tools, most beginner kits also require you to install essential software and drivers before you can run your first job. Programs like LightBurn or LaserGRBL are commonly used to interface with your machine, and setting them up correctly involves establishing the proper workspace dimensions, baud rates, and homing cycles. Taking the time to properly route your cables and run a dry-fire test—moving the gantry manually via software without firing the laser—will protect your new investment and ensure smooth operation from day one.
Unpacking your first laser engraver brings everything you need to transition from unboxing to assembly. By double-checking your inventory against the manufacturer's packing list, you can ensure your hardware is complete and set up your workspace safely for your inaugural test burn.


